How To Get Email Subscribers As A Newbie
I am an affiliate with links to an online retailer in this blog post. When you read what I have written about a particular product and click on that link and buy something from the retailer, I can earn a commission. Please note that I only recommend products that I truly believe in and use in my business. Please read my full disclaimer here
 Have you seen my blog post The Ultimate Email Marketing Strategy For Bloggers, Marketers And Beginners? You can read it here.
In that super detailed blog post I went through how to start email marketing and why it was important that as a new marketer, you start to build your email list.
Some of the key concepts in that post needed a bit more flesh on the bones so this is why I have created a series of posts to dive a little bit deeper into each concept so you can have a complete view of how email marketing works.
If you have a blog and you’re getting traffic from it, then that’s great.
Your blog might convert well but the number one goal from your blog should always be to get email subscribers.
Email subscribers are actually a lot more valuable than website visitors because your email subscribers actually stay with you.
They are also updated more regularly with your content if you have a good email autoresponder sequence.
Website visitors however are not guaranteed to return.
Therefore from the moment you start a blog, and you can learn how to do that from this blog post, you must implement various things to start building an email list.
That’s the reason for this post and I am going to show you some key actionable steps that you can take from day one to start getting email subscribers from your blog.
Here’s what you will learn in this blog post:
- Email marketing software for storing emails
- How to create custom thank you pages for more exposure
- How to set up opt in forms on your blog
- Landing pages to collect your leads
- Writing to your email subscribers
How To Get Email Subscribers As A Newbie
Email marketing software for storing emails
It is crucial that you have and use a service that can store your leads for you and also send them regular updates via email.
Most email capture facilities, like SumoMe or Hubspot Free Marketing Plugin For WordPress are merely lead capture forms that collect your leads.
You however need a proper email marketing service that stores the leads and sends emails to them automatically.
I see too many new bloggers using these free opt in forms to get email addresses but what exactly are you doing with the email addresses?
Are you engaging with your subscribers by sending them regular content.
If you were to send your subscribers an email now, will they know who you are?
This is why you should avoid making that big mistake of simply capturing email leads. You also need an email marketing service that will help you store and communicate with your leads frequently.
The number one software that I personally use and which I would recommend to my readers is Aweber.
I love Aweber because it has a high deliverability rate and will ensure that my emails are being delivered to my reader’s inbox.
You can also use other email software like GetResponse or MailChimp. I have used both of these but have decided to settle on Aweber because of the simplicity of use and the higher probability that my emails are being delivered to subscribers’ inboxes rather than junk mail.
Of course you can test any email service provider you want but for the purposes of this tutorial I will show you how to get email subscribers using the Aweber marketing service.
If you have decided to use Aweber as your email marketing provider then be sure to read this blog post where I show you how to set up your first email list so you can start the process of collecting emails.
How to create custom thank you pages for more exposure
The email subscriber journey goes something like this:
They see your email capture page
They opt in
Then they are taken either to the actual content that you promised them on the email capture page which may be a download or strategically taken to a thank you page.
Many marketers miss this point when doing email marketing and there is actually a reason for doing it so that you can get more value from every email subscriber that you collect.
The thank you page is a great way for your subscriber to actually follow you on other social media outlets or you can ask them to share your content with their friends.
Personally I like to ask my subscriber to share my content with their friends as this gives me more exposure to other people who may not know about me.
Here is what my thank you page looks like
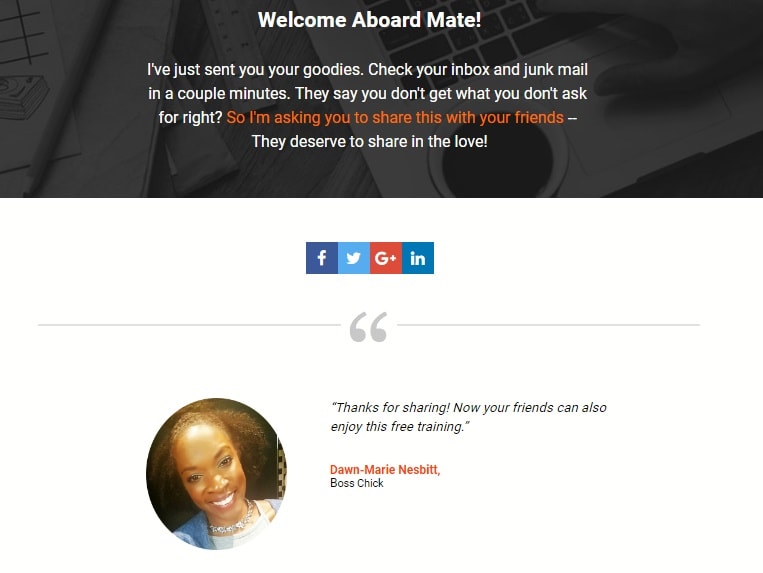
As you can see from my page I have done two things.
I have told them where to find the content that I sent to them. This is super important because these days email providers like Hotmail or Gmail are doing everything possible to eliminate spam from their users’ inbox.
Sometimes your email may be sent to the subscriber’s junk mail without the subscriber knowing.
As a marketer we know about these troubles but the amateur subscriber does not. This is why you can use your thank you page to tell the subscriber to check their junk mail just in case they do not see it in their inbox.
The next thing that you can use a thank you page for, is to gain more exposure by asking the subscriber to share your content with their friends on social media.
WHOA!!! Great idea right?!
That’s opening up the possibility for more people to see your content and get to know who you are.
At the end of the day, if you don’t ask, you will never receive and this further step can direct more traffic back to your blog.
Create Your Own Page
I create my thank you pages using LeadPages.
Then I add my thank you page URL to Aweber. This is how I do it.
Once you have signed up with LeadPages (they offer a 14 day free trial so you can test them out) you will click on Lead Pages then Create New Page.

LeadPages also have a split test feature which allows you to create two thank you pages to see which one gives a higher conversion based on your conversion goal – whether that be engagement by sharing your page or not.
After you click Create New Page you will then be directed to all their templates. Use the drop down menu on the right to select only the thank you pages.
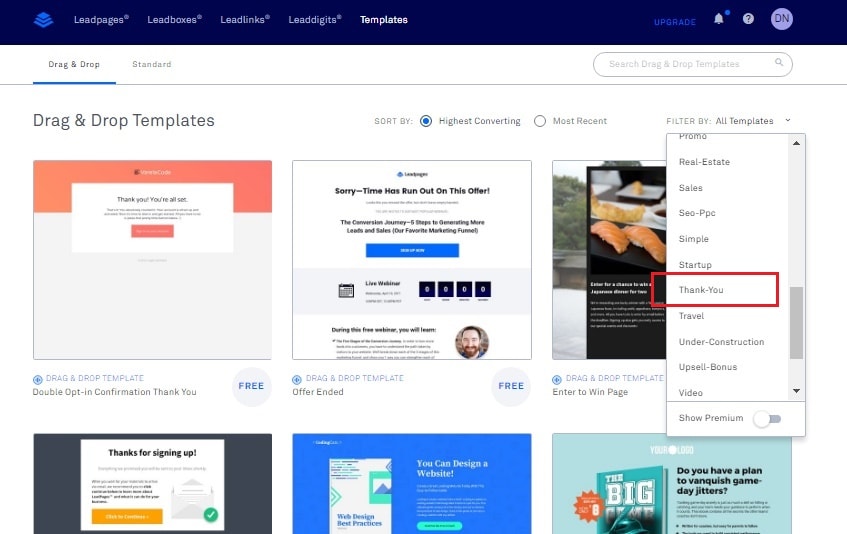
You will then be given free thank you page templates that you can customise to your liking.
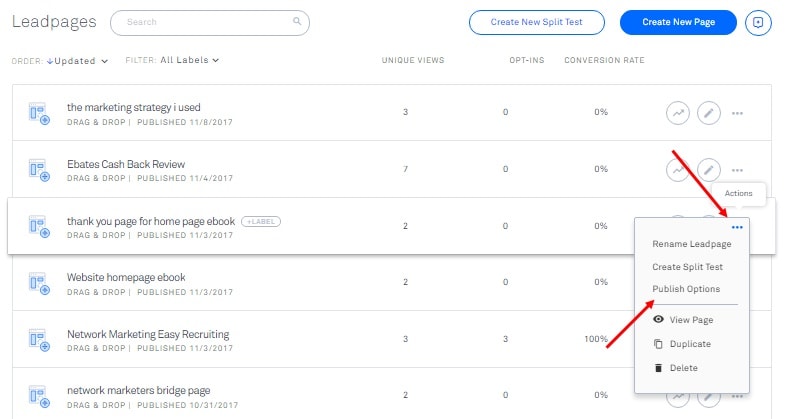
Thank you page created? Ok great. LeadPages gives you a few options for publishing your thank you page. To find those options click on the three dots next to the thank you page you have created. A drop down menu will appear where you will select Publish Options.
A pop up box will appear and you will have three options but stay with the first option which is Publish Status where they give you the thank you page URL.
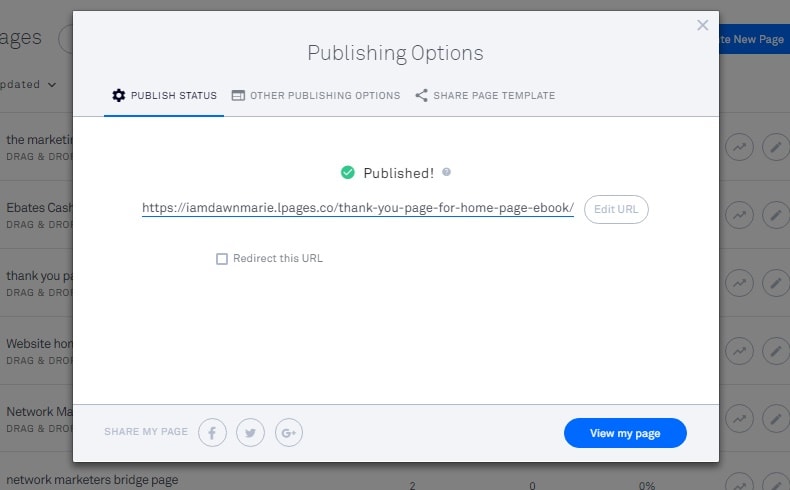
Copy this URL then head on over to Aweber where you will add the thank you page URL to your sign up form.
I am assuming that you have already created your first email list and sign up form with Aweber after following my tutorial here.
Find the sign up form that you want to add your thank you page to by selecting your email list from the Current List menu, then click on Sign Up Forms.

Once you have found the sign up form click on Edit.
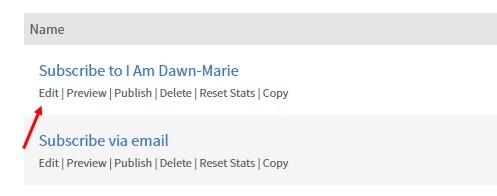
Then click on Settings. Go the Thank You Page drop down menu and select Custom Page.
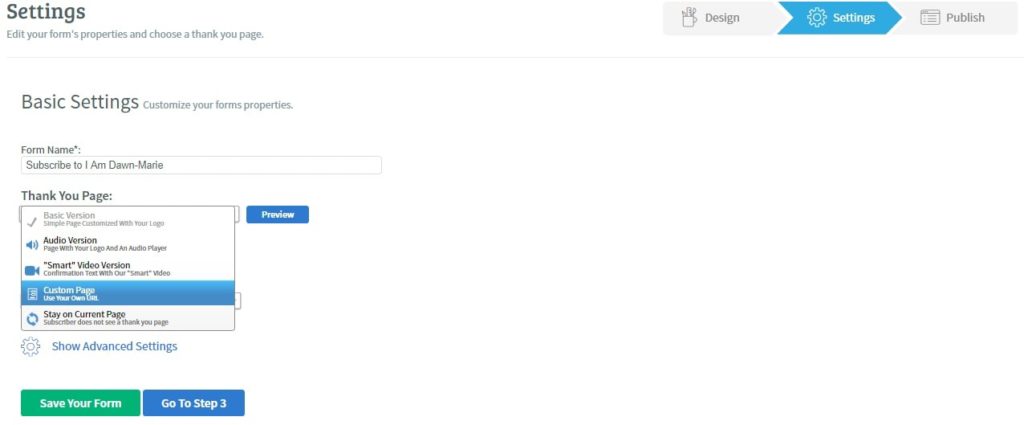
Then plug in the LeadPages URL into the field that appears and click on Save Your Form.
So whenever your subscriber opts into the email capture form, they will be directed to your Thank you page URL. Be sure to test it yourself to confirm that all works well by opting into your own form.
How to set up opt in forms on your blog
When you are trying to squeeze a subscriber out of every visitor you get to your blog your aim should be to put your opt in forms in just about every place you can to attract people to subscribe.
Here are a few places where I have put opt in boxes on my blog:
- Top bar
- Footer
- Side column
- In line
Top bar
If you look at the top of this blog post you will see a bar which if you click on it directs my visitors to a lead page. This is a three step process which informs the visitor about my free giveaway, takes them to a page which educates the visitor about affiliate marketing and then entices them to subscribe by giving away a free e-course.
The reason why I chose the top bar is because it is completely visible and is the first thing visitors see as soon as they land on my page.
There are many top bar plug ins available with WordPress. I use the WP Front Notifications top bar but to find others that will suit your needs simply go to Plug Ins in your WordPress dashboard then do a search for top bars and you will get a wide selection of plugins to choose from.
If you are using the top bar plug in make sure that you have a lead page or lead magnet to send your visitors to.
To create my lead page or lead magnet I use LeadPages.
Footer
The footer opt in form is not one of the best places to put an opt in form as the opt in depends on how far down the visitor reads your post.
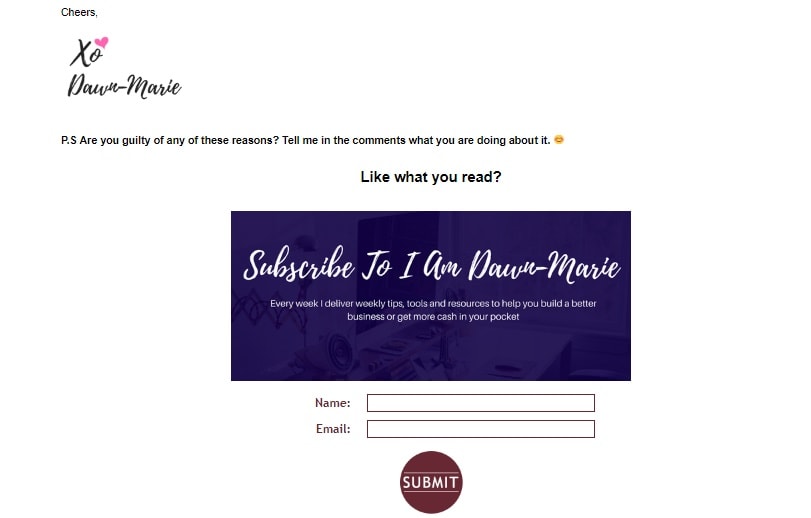
Regardless of that, I ask for the subscribe on most of my posts at the end of the blog post for those users who do actually make it to the end of my post.
This tells me that the visitor is engaged and if they read the entire post they may like my other posts.
My footer opt in form looks like this and is an embedded form using Aweber.
When you create a sign up form using Aweber, they give you HTML code that you can place anywhere on your website where you want the form to appear.
The HTML code is found by clicking on the Publish tab of your sign up form. Select I Will Install My Form.
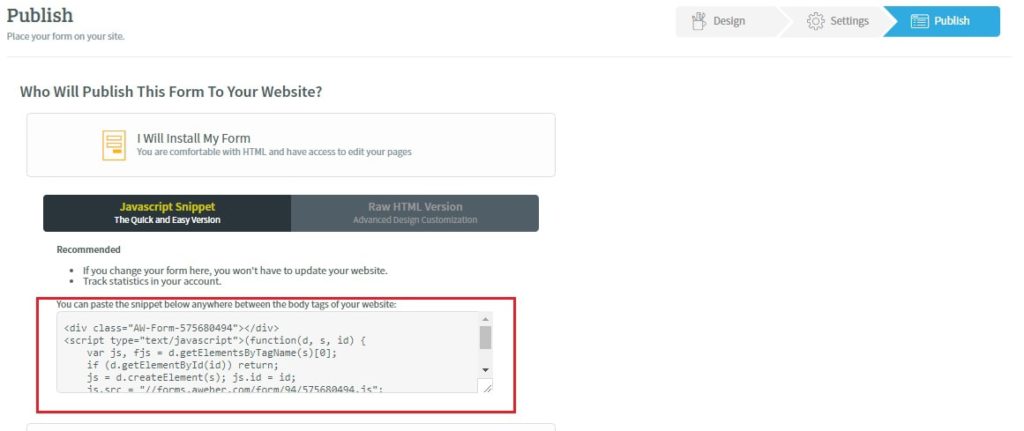
To place the form on your blog, grab your HTML code from Aweber.
Then head on over to your blog post and select the Text label on your WordPress editor.
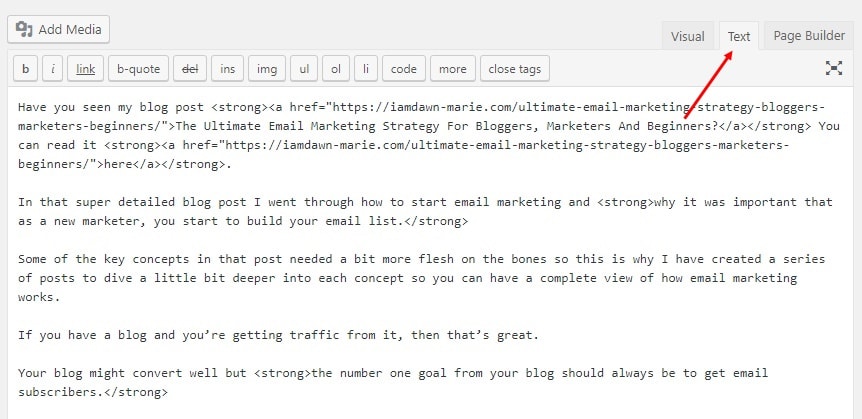
Then paste the HTML code at the end of all the text in the editor.
Side Column
The side column opt in form again is provided by Aweber HTML. I have used this form to simply request people who want to keep up to date with my blog.
To create the side column opt in form you will have to use the WordPress widgets which allows you to add images, text, or HTML to your side columns.
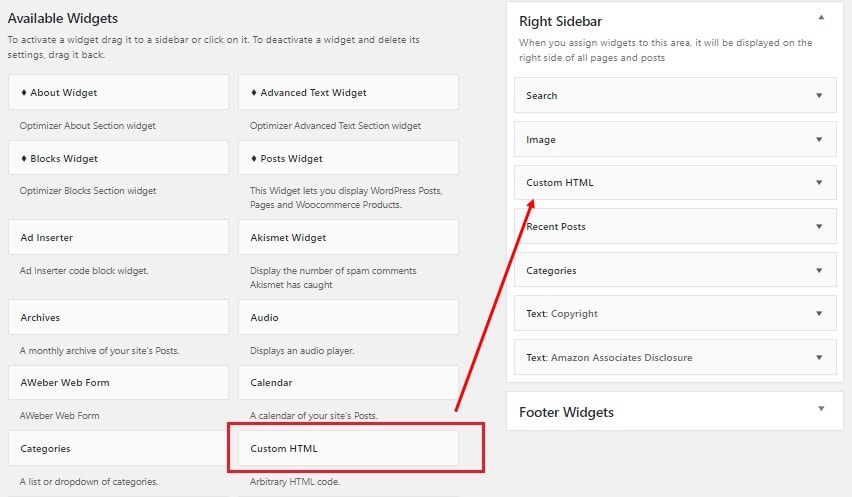
To find the WordPress widgets click on Appearance then Widgets.
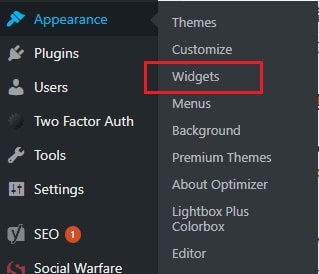
To add the HTML from Aweber drag the Custom HTML tab to the right sidebar tab and place it where you would like the opt in form to appear on your blog.
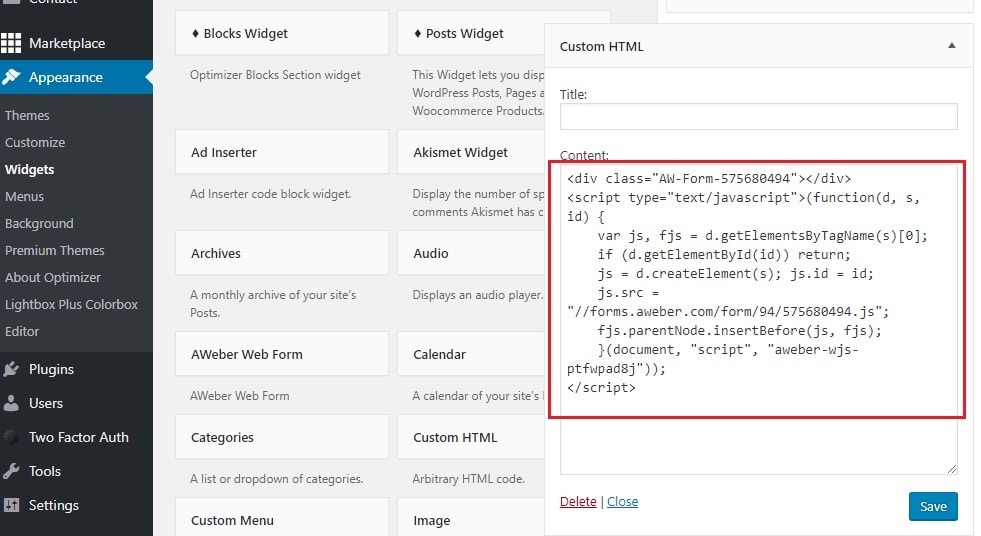
Then copy and paste the HTML code from Aweber into the Custom HTML field.
You can also aim to offer something to the visitor to obtain their email address. All you have to do is customise your opt in form based on the giveaway you want to share, then copy and paste the HTML code in the same way that you would for the basic opt in form.
In Line Opt In form
The in line opt in form is great to get more subscribers to your email list as it seeks to interrupt the visitor’s reading pattern with a bribe for their email details.
The key to making in line opt in forms work, is to offer the visitor something in exchange for their email address.
However that something must be relevant to what they are reading.
For example, in my post How To Create An Online Clothing Store, I know that readers here would be eCommerce store owners who need products for their store.
I therefore created an inline opt in form and bribed the reader by offering to them a massive list of wholesalers and dropshippers which they could get simply by providing me with their email address.
The opt in form was relevant because it provided an offer which every eCommerce store owner needs.
So if you have a blog post on how to take the best photographs, it would be irrelevant to offer the reader something that relates to food. Do you see what I mean?
In line opt in forms are also known as content upgrades. So if you read about them you now know what they are.
To create my in line opt in forms I use Aweber as well. Just like your footer opt in form Aweber gives you that piece of HTML code which you can add anywhere in your blog post.
If you want you can also create a pop open inline form using lead boxes from LeadPages.
Simply create your leadbox from the LeadPages dashboard.

Then when you are ready to publish the lead box select the three dots next to your lead box and choose the Publish Options.

You will then be given five options to choose from which you can use depending on how you want the lead box to appear on your blog.
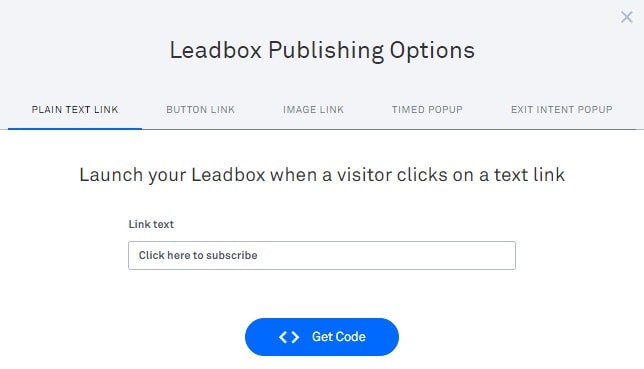
After selecting one of the five options click on the blue button Get Code then follow the instructions given to you by LeadPages.
Pop Ups
Some of you have asked about pop ups and the reason why I left it for last is because I am not a major fan of them.
Pop ups are very intrusive especially when a new visitor lands on your website and the first thing that stares them in the face is a pop up box asking for their email address.
Pop ups can also lead to higher bounce rates as some visitors do not like them and prefer to abandon your site.
That does not mean that you cannot use pop ups effectively.
If you are using pop up opt in forms here are some best practices to follow:
- Delay your pop up to appear a few seconds after the user lands on your website. Usually a 20 to 40 second gap is ideal.
- Use exit pop ups. These are opt in forms that are timed to display if it appears that the user is trying to leave a page. Exit pop ups are useful on desktops but with more and more people viewing content on their mobile phone this may not be a great option.
- Pop ups should be easy to close. Nothing is more annoying than having a pop up appear and you do not know how to close it. Sometimes your visitor may not be interested in what you have to offer and so will decline the offer by closing the pop up. If the ability to close the pop up is difficult, such as the exit link is not visible, you can lose visitors. Therefore make sure that your pop up can be easily closed to avoid losing readers.
Landing Pages to Collect Your Leads
I have already mentioned that I use the LeadPages tool to create landing pages and collect my leads.
This is just another way to give more information to your potential subscriber instead of the usual three or four lines of text that you would find on a simple opt in form.
With landing pages, I like to offer a bit more value to my reader so they know what kind of information they are likely to get when they subscribe to my offer.
Here is an example of one of my landing pages that I have created for this blog. I then attach the URL to this landing page throughout my blog on the top bar, within banners on the side column or within my text.
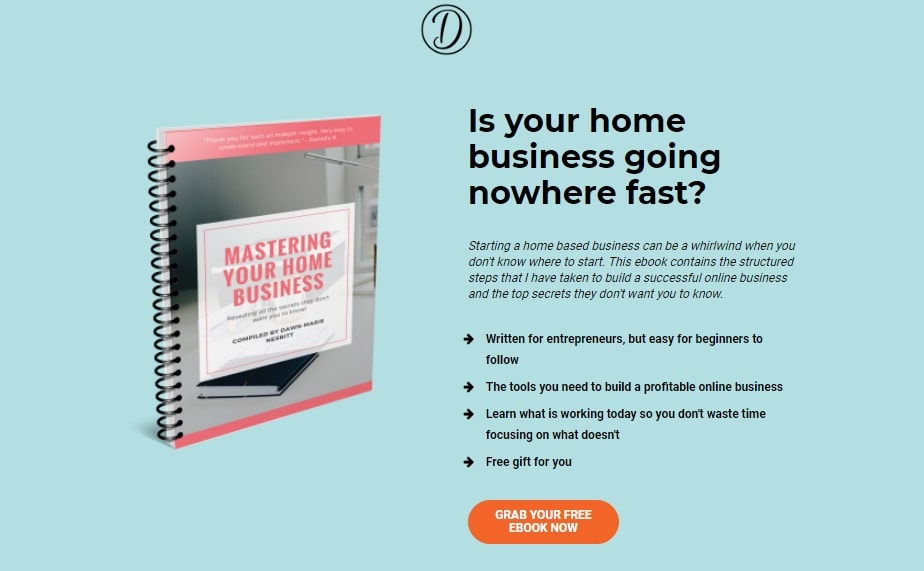
Your landing pages do not have to be as detailed as the one I have showed you.
Landing pages can be very simple like this one.
You can also use Clickfunnels to create your landing pages. Clickfunnels is just another landing page builder but a bit on the pricier side.
With Clickfunnels you do get other features such as the ability to integrate payment options, to create sales funnels, to do split testing, to track your visitors and opt ins.
Honestly I prefer LeadPages because it is much cheaper and I love their designs and how clean their images appear.
Writing to your email subscribers
Ok so by now you should have gone through the previous tutorial on how to start with email marketing.
You should have also sprinkled some opt in forms onto your blog and connected them to your email marketing software after reading this guide.
Now what do you say to your subscribers?
Within Aweber you can add an email autoresponder series which will greet each subscriber as they opt in to your form. You can do that by selecting the appropriate email list, hover over Messages and select Legacy Follow Up Series from the drop down menu.

I would recommend setting up at least four to five emails to send to your subscribers just as I have done, depending on what you want to offer them.
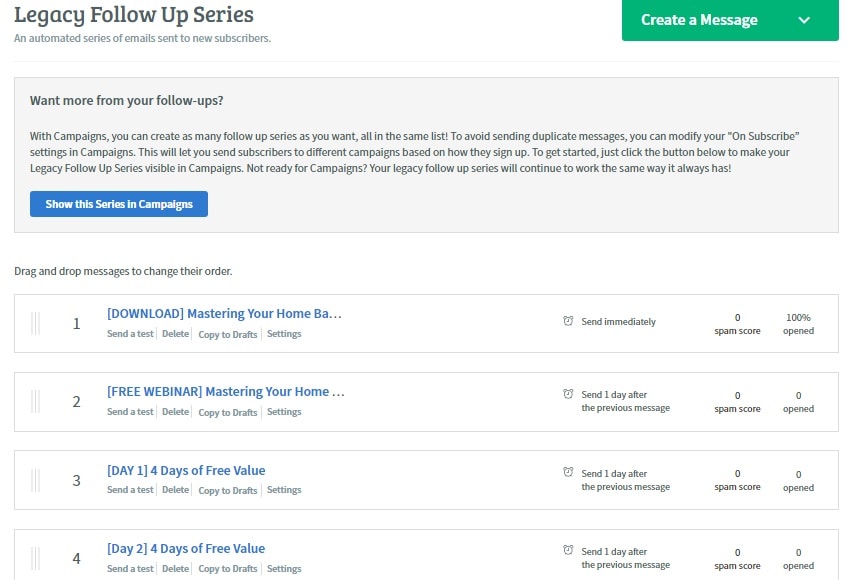
After the email series have been completed I like to send my subscribers weekly broadcasts just to keep in touch with them.
Broadcasts are simply single emails that you send to all of your subscribers on an adhoc basis. These do not go out automatically as they would in an email autoresponder series.
Usually I like to send broadcasts to my email subscribers when I have created a new post or when I have an announcement.
To send a broadcast with Aweber select the list that you want to send the broadcast to.
Hover over Messages then select Broadcasts.
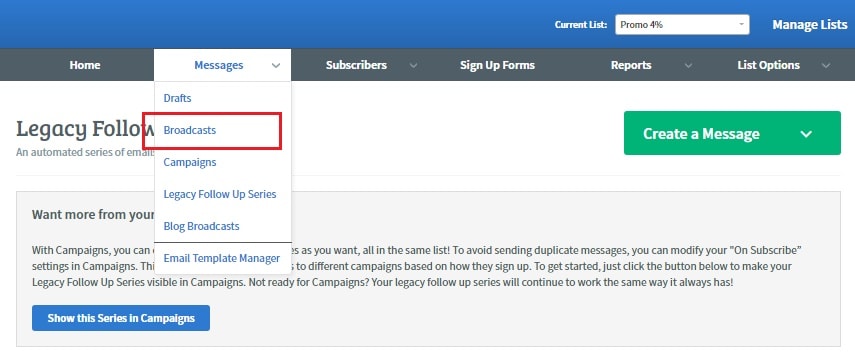
Select the green button Create A Message.
Compose your message in the editor.
Make sure and preview and test your email message before saving it to ensure that it is exactly the way you want it to be sent.
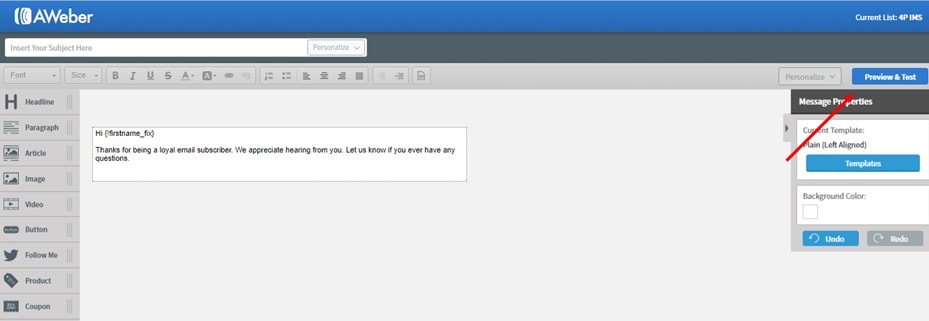
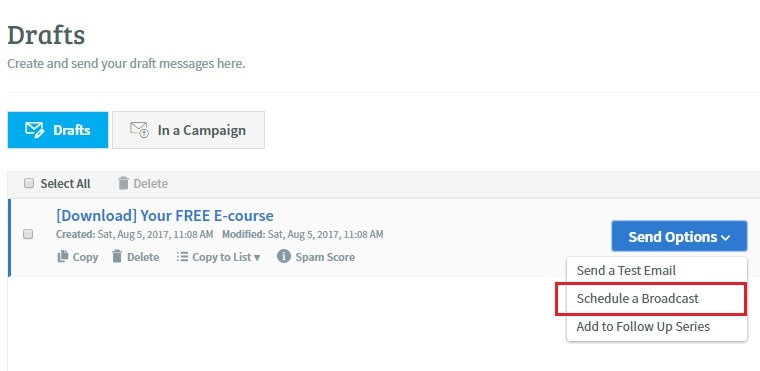
Once you are satisfied with the email click Save & Exit at the bottom right corner which will take you to your broadcast draft folder.
Click on Send Options and select Schedule A Broadcast.
If you want to send this broadcast to more than one email list select Edit then choose the lists that you want to receive your broadcast.
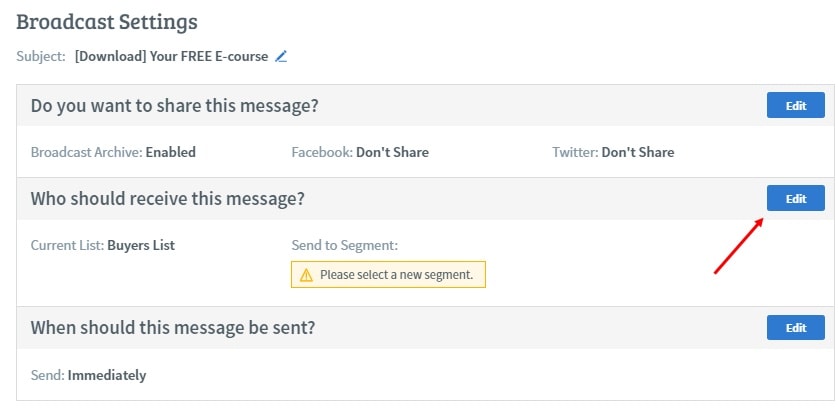
Once the broadcast settings are to your liking click the green Send Message Now button.
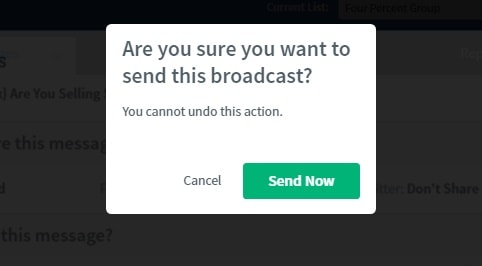
You will get a final prompt asking if you want to send the broadcast immediately.
Click Send Now and off the broadcast goes.
Aweber will track how your broadcast performed by telling you how many of your subscribers opened your email and how many clicked on your link.
Wrapping Up
So there you have it. A complete guide to getting email subscribers.
If you haven’t already, it’s time for you to take action and start getting subscribers to your own list.
Obviously the bigger list you have, the more valuable it is for you.
So make sure and get started today.
There is so much more to email marketing and I have only touched the surface in my posts which I hope are helpful to you.
If you want to become a pro at email marketing and learn all the techniques you can use to convert your email subscribers into buyers then I would strongly recommend Aweber’s Email Marketing Masterclass where they teach email list building strategies and where to find people to actually subscribe to your email list.
This was the first course that taught me everything about email marketing and affiliate marketing and I cannot recommend it enough.
I only recommend products that I have tried and tested and will help my readers.
If you have any questions for me that I can help you with on email marketing then feel free to leave a comment below and I will be sure to get right back to you.
Cheers,

 Previous Post
 Next Post
